We’ve restructured the template editing page a little bit to group things together in a more logical flow (we think!).
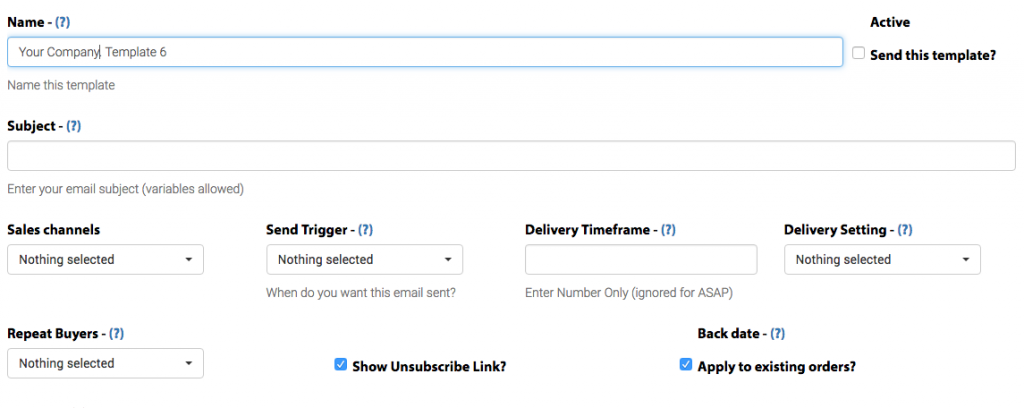
So first we have the NAME of the template. This is an internal name that your customers won’t see, so you can call it anything you like to remind yourself what it does (e.g. “Order confirmation”).
After that we have a check box to activate the template. By default templates are created inactive, so you can save them while they are incomplete and not worry about them going out! Templates can be activated and deactivated on this editing page, or on the template’s details page or even just from the list of templates.
Next we have the SUBJECT, which is what will be seen by your customers. Remember that you can use our email variables in the subject line as well, so you can do something like “Thank you for your %%product_nick%% purchase”, which will substitute in the nickname (or if you haven’t filled in a nickname, the full listing title) of the product they bought.
The next line is where you target orders and set triggers.
First is ‘SALES CHANNEL’ where you can choose Amazon.com, Amazon.ca or Amazon.com.mx if you have a North American store, or Amazon.co.uk, Amazon.fr, Amazon.de, Amazon.it or Amazon.es if you have a European store.
Next comes the SEND TRIGGER, which tells us after what event in the lifetime of an order do you want to send this template out. Values can be Confirmed (meaning the order was completed and paid for on Amazon), Shipped, Delivered or Returned.
DELIVERY SETTING – the last option on this line – is to say when after the Trigger to send this email. ASAP, or a set number of hours, days, weeks or months. If you choose anything but ASAP you have to enter in a DELIVERY TIMEFRAME (eg 1 to go with your ‘hours’).
On the next line are some extra goodies – REPEAT BUYERS lets you choose if you want to send to Everyone or just new customers or only repeat customers. SHOW UNSUBSCRIBE LINK will put a quick link at the bottom of your emails so customers can blacklist themselves (don’t forget this is a legal requirement to have this link in Europe).
Finally is the rather confusing – and soon to be phased out – BACKDATE. We suggest leaving this active.
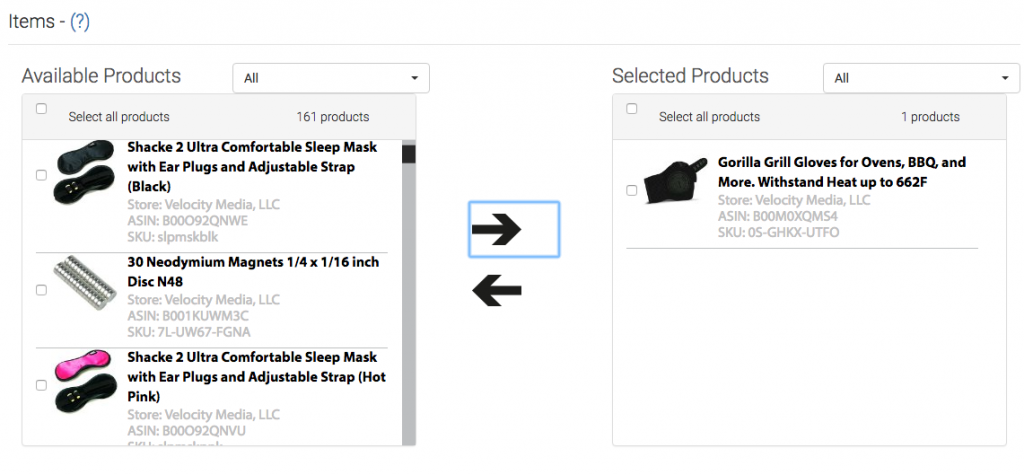
After you’ve set up all your administrative stuff you can choose which of your items will trigger this template.
Choose an item from the left list of all your items for sale and move it over to the right. Or you can click ‘Select All’ to choose them all.
Please be aware that if you add more items for sale, and you’ve chosen ‘select all’ in the past, those new items will NOT trigger this template. You’ll have to come back and edit the template.

Finally you can get down to writing the text of your email. For more sophisticated control, under the TOOLS menu you can VIEW SOURCE and edit the raw HTML source of the email.
Under the INSERT menu is INSERT TEMPLATE that will let you pick from our list of EMAIL VARIABLES.
We hope this breakdown of the page will help you create exciting templates to send to your customers!

- Are My Emails Compliant with Amazon Policy? - August 22, 2023
- Amazon AI-Powered Reviews for Sellers: A New Era of Customer Feedback - August 16, 2023
- Amazon Prime Day Opportunities: Unlock Success with Amazon’s Prime Big Deal Days in October 2023 - August 13, 2023